Category

Angular

Introduction to Angular Forms

Introduction to Angular Forms

By | Angular | No Comments

With Angular there are 2 main ways to create HTML forms

  • Template Driven Forms
  • Reactive Forms (also called as Model Driven Forms)

Each of these approaches have some of their own advantages and disadvantages. Template Driven forms are useful when we want to create a simple form i.e. form which has lesser number of fields and most the fields on the form are static. Reactive forms are useful when your form is complex or has dynamic fields or you want to do cross-field validation.

Template Driven Forms

For Template driven forms, we can us angular directives ngForm and ngModel. Here is simple template drive form html.

Here is simple template drive form html.

We have declared a simple form with three controls: First Name , Last Name and Email, All are mandatory fields.The Submit button is only enabled when both required fields have values. On form submit it will call controller method saveEmployee.

Angular is tracking three form field states

  • touched or untouched
  • valid or invalid
  • pristine or dirty

Angular also checks the validity state of the whole form. Form valid status is used to enable or disable the submit button. This functionality is common for template-driven and reactive forms.

Angular directive ngModel is used for data binding. It keeps the HTML element value and it’s corresponding component property in sync.

Note the following line of code.

Here #employeeForm is called as template reference variable. We have assigned “ngForm” as the value for the template reference variable employeeForm. Hence employeeForm variable holds a reference to the form. In Angular it automatically attaches the ngForm directive to the form, when it sees a form tag. The ngForm directive provides additional features to the form element. It holds all the controls in the form that we create with ngModel directive and name attribute, and monitors their properties like value, dirty, touched, valid etc. The form also has all these properties.

In this case, because both validation and binding are done at the level of the template in a declarative way, So this is called template-driven forms,.

Here we have set ngModel directive to “firstName”, but we do not have ” firstName ” property in the component class. Angular automatically creates ” firstName ” property using the value of the “name” attribute of the HTML input element. This is why “name” attribute is also required when we use ngModel directive. In case we forget to provide “name” attribute, angular gives the following error:

If ngModel is used within a form tag, either the name attribute must be set or the form control must be defined as ‘standalone’ in ngModelOptions.

If we want an input element to be tracked by the form, we need to include both the name attribute and ngModel directive. Otherwise that input element won’t be the part of the Form model created by Angular.

Here is the code of a controller for this html. It simply logs value of employeeForm.

The ngForm directive is provided by Angular FormsModule. So we will have to import the FormsModule in our AppModule file (app.module.ts).

Here is app.module.ts
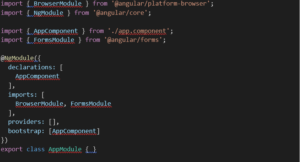
Advantages and Disadvantages of Template Driven Forms

As this is a quite simple example, we might not realize it, but adding all validations in the template becomes hard to read. Also as validation logic becomes complex it becomes difficult to handle it in the template.

The advantage of this approach is simplicity, and it’s enough to build most of the forms. Disadvantage is, the form validation logic cannot be unit tested.

Reactive (Model Driven) Forms

Reactive forms give us freedom to build the form completely in code. This is more flexible and has many advantages over template forms. For example, it is easy to add form input elements dynamically and change validation logic at run-time based on different conditions in code. It is also easy to unit test as most of the logic and validation is in the component class. The only downside of reactive forms is, for reactive forms we need to write more code than template forms. With a reactive form, we create all form controls in the component class code. Let us try to understand this with a simple form with just 3 form controls as shown below

Here is the modified HTML. Notice the use of formGroup and formControlName directives in the <form> element and the 3 input elements.

Here is the controller code for the same.
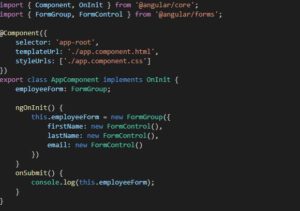
Two classes that we commonly use to create a form control tree are FormGroup and FormControl. As the names imply to create a form with a group of controls, we create an instance of FormGroup class and to create each input element i.e a form control, we create an instance of FormControl class

To bind the view template to the form group model we created in the component class, we make use of the following 2 directives provided by Angular ReactiveFroms module.

formGroup formControlName

If we try to execute this code, we will get the following error

Can’t bind to ‘formGroup’ since it isn’t a known property of ‘form’

This is because, the 2 directives (formGroup and formControlName) are in the ReactiveForms module, but we have not yet imported it in our root module. So in the

AppModule (app.module.ts file), import ReactiveFormsModule and include it in the imports array.

Our AppModule code will be as follows.
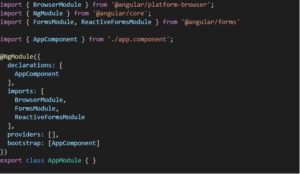
You are probably wondering what we gained here.
We can now move validations part to the controller as follows.
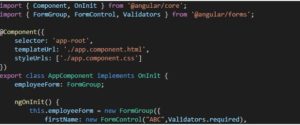
We can now set values of the controls from the controller. We can also unit test the form validation logic. We can edit data for the form in controller. We can use setValue() and patchValue() function to change the entire form data or part of the data from controller.

To shorten code required to create the form, we can also use FormBuilder class. But we need to use FormBuiler as a service.

Form group accepts both form control and form group instances as children. This allows us to create a nested form group

For e.g. here is sample code to create nested form group using FormBuilder

We also need to change this in the html template for the nested address field as follows


angular material

Getting Started with Angular Material

By | Angular | No Comments

What is Angular Material?

Angular Material is a collection of UI components based on Material Design which aims to provide a rich and highly intuitive user experience.  It assists developers, designers to build awesome Angular apps quickly and effortlessly.

It comprises a range of components categorized by:

  • Form Controls
  • Navigation
  • Layout
  • Buttons and Indicators
  • Popups and Modals
  • Data Table

For getting started with a new Angular App, follow: https://angular.io/start

Follow these steps to begin using Angular Material with existing Apps


Step 1: Install Angular Material, Angular Animations, Angular Cdk

$ npm install --save @angular/material @angular/animations @angular/cdk

Step 2 (Optional but recommended): Install HammerJS for Gesture Support

Click Here

Some components like matTooltip, mat-slide-toggle, mat-slider require gesture detection to function properly. HammerJS is a popular library that helps you add support for gestures like tap, swipe, pan, zoom, rotate on your page.

It can be found at https://hammerjs.github.io/

$ npm install --save hammerjs

Import it to your app’s root module.

import 'hammerjs';

Step 3 (Important): Including a pre-built theme in styles.css

@import “~@angular/material/prebuilt-themes/indigo-pink.css”;

Note: It’s mandatory to import a theme to get started with Angular Material. Themes available: deeppurple-amber.css, indigo-pink.css, pink-bluegrey.css, purple-green.css

Step 4: Import Browser Animations

Import Browser Animations Module to your app module for animations support.

import { BrowserAnimationsModule } from '@angular/platform-browser/animations';

@NgModule({
// …
imports: [BrowserAnimationsModule]
})
export class AppModule { }

Step 5: Import Component modules

Import required component modules. Even though we can add all material components to app.module.ts, this is not recommended. We will add these modules to a separate module say material.module.ts and export it.

import {MatButtonModule} from ‘@angular/material/button’;

import {MatTooltipModule} from ‘@angular/material/tooltip’;

@NgModule({

exports: [

MatButtonModule,

MatTooltipModule,

]

})

export class CustomizedMaterialModule {}

We will include CustomizedMaterialModule wherever Material Components are required. For now let’s include it to our app.module.ts file.

import { CustomizedMaterialModule} from ‘./material.module’;

Step 6(Optional): You can also access Material Design icons using <mat-icon> component.

We will add this to the project’s root index.html file.

<link href="https://fonts.googleapis.com/icon?family=Material+Icons" rel="stylesheet">

Follow this Guide for Material Icons: https://google.github.io/material-design-icons/

Angular Material is ready to use!

We can now use Angular Material components to create a beautiful application without investing too much time thinking about styles.

Checkout Angular Material website to explore components and its implementation: https://material.angular.io/

Example

Here is a basic example for different types of buttons provided by Angular Material.  Colours – primary, accent, warn are based on the theme we included earlier. Let’s also add tooltips on buttons which show up on hover.

html file: basic-buttons-example.html

<div class="buttons-container">
<button mat-raised-button matTooltip="Go to next Page"
[matTooltipPosition]="left" aria-label="plain">
OK
</button>
<button mat-raised-button matTooltip="Cancel Selection"
[matTooltipPosition]="top" aria-label="primary" color="primary">
Cancel
</button>
<button mat-mini-fab matTooltip="Valid"
[matTooltipPosition]="right" aria-label="accent" color="accent">
<mat-icon>check</mat-icon>
</button>
<div class="mic-container">
<button mat-fab matTooltip="Say Something"
[matTooltipPosition]="bottom" aria-label="warn" color="warn">
<mat-icon>mic</mat-icon>
</button>
</div>
</div>

CSS file: basic-buttons-example.css

.mic-container {
padding: 30px;
text-align: center;
}
.mat-raised-button {
margin-right: 20px;
}
.buttons-container {
text-align: center;
padding-top: 200px;
padding-bottom: 200px;
}

Component class: basic-buttons-example.ts

import {Component} from '@angular/core';

@Component({
selector: ‘basic-buttons-example’,
templateUrl: ‘basic-buttons-example.html’,
styleUrls: [‘basic-buttons-example.css’],
animations: []
})
export class BasicButtonsExample {
top = ‘above’;
bottom = ‘below’;
left = ‘left’;
right = ‘right’;
}

Yay  Here is the result!

angular_material_demo

TL;DR Angular Material has taken the aesthetics of design to a whole new level with its visually appealing UI while delivering a top-notch UX.

References:

State Management in Angular ( Blog)

State Management in Angular

By | Angular | No Comments

Week after week we as JavaScript developers are exposed to new technologies and ways to write our applications. Most recently, state management has become a hot-button topic. but what is exactly state management?? I guess we can break this down in layers.

What is State?

The state is all of the information that is retained by your program, often with respect to previous events or interactions

When it comes to client-side JavaScript applications, I like to think of the state as “the outcome of all of the actions that the user has taken since the page loaded”.

This isn’t an all-encompassing way of thinking about the state, as other agents might affect state — the server might set some variables, a service worker might do something in the background, etc. However, I found it a useful place to start when I was building my understanding.

For example, I load a page. I click a button which makes an HTTP request. The HTTP request fails, and the screen now shows an error.

What is the action? A button was clicked, it sent off a request, and the request failed.

What is the outcome? An error message.

If we were to describe that state as an object, it might look like this:

const state = {
errors: ["Sorry, we couldn't save your article, try again later"]
}

Of course, I would also show that error message on the screen.

If you’re used to working with smatterings of JavaScript, you might be familiar with handling the failure of an Ajax request and displaying the error on the screen. What you might not be familiar with is actually storing the error in an object as I’ve done above.

This is where State Management in Angular comes in

In both situations, the state is the same — there’s an error message. But when we manage our state, we create an explicit data structure (in my case, an object with a key named ‘errors’) to record the outcomes of the user’s actions.

State management libraries provide us with tools for creating these data structures and updating them when new actions occur.

Without a state management system, how do we know what the state of our application is? We look at the DOM. We can check DOM elements to see if they have certain classes (‘active’, ‘error’), or to check whether certain elements exist.

With a state management system, to find out what the state of our application is, we check our state data structure. The DOM should reflect the data, but the data is the Source Of Truth.

Why would I want to use state management tools?

For me, the key to understanding state management was when I realized that there is always a state. Whether or not I’m managing it, with an interactive web application, there is always state — users perform actions, and things change in response to those actions.

State management makes the state of your app tangible in the form of a data structure that you can read from and write to. It makes your ‘invisible’ state clearly visible for you to work with.

Rather than looking at the DOM and deducing state based on what is there and what is not, an explicit data structure is much easier to understand.

When you’re creating larger and more complex JavaScript applications, having explicit data to work within a predictable way is beneficial to developers. It’s much easier to reason about and manipulate, and it’s less bug-prone.

One of the biggest challenges with any application is managing data. In the world of Angular, there are a lot of patterns to follow to manage your application. These typically involve using decorators like Input and Output, or things like RxJs Observables to watch for data changes. However, there is a reactive state technology that solves this challenge called Ngrx.

NGRX

Ngrx is an open-source library that provides reactive state management for your Angular applications. Inspired by Redux, Ngrx provides a way to maintain data in your Angular application as a single source of truth. Ngrx uses streams to interact with a data store. This data store connects to your components and services and ultimately simplifies the entire process of data management in your Angular application. Instead of injecting services everywhere and managing communication between them, Ngrx manages your application from one singular source. Using Ngrx, you work with your application in terms of its overall state, instead of individual components.

How Ngrx works

There are five parts that constitute Ngrx:

  1. Store
  2. Reducers (and Meta-Reducers)
  3. Actions
  4. Selectors
  5. Effects

The basic implementation looks like the following:

Angular (Blog)
  1. Your application’s state is maintained in the store. The store is immutable.
  2. Your application’s components can subscribe to the store and get automatic updates of the state through selectors.
  3. Selectors enable components to get a slice (a part) of your application’s state, and also mutate state with selector functions.
  4. Actions modify the state of the store by using reducers (functions) that enable changes while keeping it immutable.
  5. Meta-Reducers (not shown) are hooks where you can pre or post-process actions before they get invoked.
  6. Effects occur as a result of actions, and can also create actions when called. Effect’s primary responsibility is to create async side-effects (like service calls to APIs), that ultimately generate other actions. This is a big change in the way that traditional applications are built and creates a paradigm that greatly simplifies complex applications. Ngrx Store is an RxJS powered state management solution for Angular apps. Ngrx store helps you build more robust applications by better organizing your app’s state — or in other words, your app’s data. Without a state management solution, dealing with complex data across multiple components can become quite difficult to handle and test.

Finally, the Coding

Prerequisites:

Make sure Node.js and Angular CLI are installed. You can run ng –version to find out the versions you have installed on your machine.

  • Nodejs: https://nodejs.org/
  • Angular CLI: https://cli.angular.io/

    1. Create an Angular App With Angular CLI

    ng new angular-state-managementSelect ‘No’ and ‘CSS’

    Would you like to add Angular routing? No
    Which stylesheet format would you like to use? CSS

    It will create all the required files and install the dependencies. This will take a few minutes.

    2. Load the Project Into the IDE

    3. Run the App

    Let’s run the app created by the CLI, just to make sure everything has been created correctly.

    npm start

    Check that the app is running on http://localhost:4200/.

    4. Install NgRx

    Let’s install the NgRx now (you can use new the terminal window or exit out from the one you are on by pressing the ctrl+C key )

    npm install @ngrx/store --save

    Alternatively, you can run ng add @ngrx/store if you have a CLI 6+ version.

    Notice that @ngrx/store has been added to the package.json file.

    5. Create a Book model

    Now we are starting to add some code. First, let’s create a  book file using the CLI.

    ng g class models/bookAs another option, you can add it using the editor.

    The book.ts file has been created in the src\app\models folder. Add a name property to it.

    export class Book {
    name: String = '';
    }

    6. Add Actions

    Now, we are going to add NgRx-related code. As our diagram above shows, the state that we are going to manage is the collection of books. We can change the collection of the book’s state using the actions. For this particular case, we have two actions that can change the state:

    • AddBook
    • RemoveBook

    Create a TypeScript file, book.actions.ts, in the src/app folder for book actions using the editor.

    Add the following code to the book.actions.ts file:

    import {Action} from '@ngrx/store';
    export enum BookActionTypes {
    Add = '[Book Component] Add',
    Remove = '[Book Component] Remove'
    }
    export class ActionEx implements Action {
    readonly type;
    payload: any;
    }
    export class BookAdd implements ActionEx {
    readonly type = BookActionTypes.Add;
    constructor(public payload: any) {
    }
    }
    export class BookRemove implements ActionEx {
    readonly type = BookActionTypes.Remove;
    constructor(public payload: any) {
    }
    }

    7. Add a Book Reducer

    Let’s add the reducer; all state changes are happening inside the reducer based on the selected ‘Action.’ If the state is changing, then the reducer will create a new book rather than mutating the existing book list. In the case of the state change, the reducer is always going to return a newly created book list object.

    Create a TypeScript file, book.reducer.ts, in the src/app folder for BookReducer using the editor.

    import {ActionEx, BookActionTypes} from './book.actions';
    export const initialState = [];
    export function BookReducer(state = initialState, action: ActionEx) {
    switch (action.type) {
    case BookActionTypes.Add:
    return [...state, action.payload];
    case BookActionTypes.Remove:
    return [
    ...state.slice(0, action.payload),
    ...state.slice(action.payload + 1)
    ];
    default:
    return state;
    }
    }

    8. Add an NgRx Store to the App

    Let’s add the store module to the app.

    Add the imports to the app.module.ts:

    import { StoreModule } from '@ngrx/store';
    import { BookReducer } from './book.reducer';

    And the store module

    StoreModule.forRoot({ books: BookReducer })

    Now the app.module.ts should look like this.

    import { BrowserModule } from '@angular/platform-browser';
    import { NgModule } from '@angular/core';
    import { AppComponent } from './app.component';
    import { StoreModule } from '@ngrx/store';
    import { BookReducer } from './book.reducer';
    @NgModule({
    declarations: [
    AppComponent
    ],
    imports: [
    BrowserModule,
    StoreModule.forRoot({ books: BookReducer })
    ],
    providers: [],
    bootstrap: [AppComponent] })
    export class AppModule { }

    9. Add a UI Component for View Books

    ng g c BooksView

    Add code to the books-view.compoment.ts file.

    Declare the books that are observable at the top of the class

    books: Observable<Book[]>;

    And modify the constructor:

    constructor(private store: Store<{ books: Book[] }>) {
    this.books = store.pipe(select('books'));
    }

    Import the required dependencies at the top:

    import {Book} from '../models/book';
    import {select, Store} from '@ngrx/store';
    import {Observable} from 'rxjs';

    Now the books-view.compoment.ts file should look like this:

    import {Component} from '@angular/core';
    import {Book} from '../models/book';
    import {Observable} from 'rxjs';
    import {select, Store} from '@ngrx/store';
    @Component({
    selector: 'app-books-view',
    templateUrl: './books-view.component.html',
    styleUrls: ['./books-view.component.css'] })
    export class BooksViewComponent {
    books: Observable<Book[]>;
    constructor(private store: Store<{ books: Book[] }>) {
    this.books = store.pipe(select('books'));
    }
    }

    Add the following code to the books-view.compoment.html file,

    <h4>List of Books</h4>
    <ul class="books">
    <li *ngFor="let book of books | async; let i=index">
    <span >{{i+1}}.</span> {{book.name}}
    </li>
    </ul>

    And just to make the list nicer add the CSS code to the books-view.compoment.css file.

    .books {
    margin: 0 0 2em 0;
    list-style-type: none;
    padding: 0;
    width: 15em;
    }
    .books li {
    background-color: steelblue;
    color: white;
    border-radius: 4px;
    padding: 4px;
    margin: 2px;
    }

    10. Add UI Controls to Add New Books

    ng g c BookAdd

    book-add.component.ts

    import {Component} from '@angular/core';
    import {select, Store} from '@ngrx/store';
    import {Book} from '../models/book';
    import {Observable} from 'rxjs';
    import {BookAdd} from '../book.actions';
    @Component({
    selector: 'app-book-add',
    templateUrl: './book-add.component.html',
    styleUrls: ['./book-add.component.css'] })
    export class BookAddComponent {
    books: Observable<Book[]>;
    constructor(private store: Store<{ books: Book[] }>) {
    this.books = store.pipe(select('books'));
    }
    AddBook(bookName: string) {
    const book = new Book();
    book.name = bookName;
    this.store.dispatch(new BookAdd(book));
    }
    }

    And the book-add.component.html file.

    <h4>Add New Book</h4>
    <input #box ><button (click)="AddBook(box.value)">Add</button>

    11. Update the App Component With BookView and BookAdd Component

    Now update the app.component.html file by removing default content and embedding both the ‘app-books-view’ and ‘app-book-add’ components.

    The app.component.html file should look like this:

    <div style="text-align:center">
    <h1>
    Welcome to {{ title }}!
    </h1>
    </div>
    <app-books-view></app-books-view>
    <app-book-add></app-book-add>

    12. Run the App

    Our coding is done! Let’s run the app again (if it is not already running).

    npm start

    13. Hook Up a ‘Remove Book’ Action

    We are going to add a button to the right side of the book label and hook up the dispatch of the BookRemove action.

    Add the following to our books-view.compoment.ts file:

    removeBook(bookIndex) {
    this.store.dispatch(new BookRemove(bookIndex));
    }

    The books-view.compoment.ts file now looks like this:

    import {Component} from '@angular/core';
    import {Book} from '../models/book';
    import {Observable} from 'rxjs';
    import {select, Store} from '@ngrx/store';
    import {BookRemove} from '../book.actions';
    @Component({
    selector: 'app-books-view',
    templateUrl: './books-view.component.html',
    styleUrls: ['./books-view.component.css'] })
    export class BooksViewComponent {
    books: Observable<Book[]>;
    constructor(private store: Store<{ books: Book[] }>) {
    this.books = store.pipe(select('books'));
    }
    removeBook(bookIndex) {
    this.store.dispatch(new BookRemove(bookIndex));
    }
    }

    And, in the books-view.compoment.html file, add the following:

    <button style="float: right" (click)="removeBook(i)">Remove</button>

    The books-view.compoment.html now looks like this:

    <h4>List of Books</h4>
    <ul class="books">
    <li *ngFor="let book of books | async; let i=index">
    <span >{{i+1}}.</span> {{book.name}}
    <button style="float: right" (click)="removeBook(i)">Remove</button>
    </li>
    </ul>

Angular vs. React ( Blog )

Angular vs. React

By | Angular, React | No Comments

Angular:

  • Angular is a full phase Framework introduced by Google, It provides a complete development environment which is consists of different libraries for state management, API Http request, Storage management, Observation, Services.
  • Uses Real Dom to maintain the state of the component
  • Uses Typescript as a programming tool or code-behind editor for Angular. So for someone new to angular Typescript is need to know that’s one of the reasons its learning curve is slightly bigger than React.
  • The Angular CLI is used for much more than just creating an Angular project. It can be used to create components, services, pipes, directives and more. Also, it helps in building, serving, testing, etc. CLI itself is quite something to learn about, it makes Angular development workflow much easier and faster.
  • Angular is used by Google, Google cloud blog, Delta, NBA, and other Google services.

Here are some scenarios where we can or must use Angular.

  • Cross Platform Mobile Application

The angular framework provides support to a developer to build hybrid mobile-based applications. Using features in Angular 2 or above versions, we can develop any type of mobile-based application using Angular which can be run on both Android and IOS.

  • Enterprise Software

Angular is a stable framework to empower development companies to build Enterprise solutions to fit their enterprise needs, as Angular is based on MVC architecture, It is a great choice for developing enterprise-level applications.

  • Progressive Web Application

Progressive Web Application is an application that can work effectively on Mobile as good as it works on a browser. We can develop Progressive Web Apps or Hybrid Mobile apps using Angular Framework. Using Angular and Ionic 2 framework is a perfect tool combination that can be used to develop hybrid applications and progressive web apps as well.

React:

  • React on the other hand is just a UI rendering library backed by Facebook who only converts code into HTML, for other things like state management(Redux) or Http request react is dependent on other third-party libraries like Redux. Etc.
  • React used Virtual DOM to update components state, Virtual DOM is a copy or representation of actual DOM. Real DOM is only updated when the react library thinks that a specific component needs to be re-render. It means in React whenever you make changes in any of your react components those changes are not made on Real DOM it first made those changes on Virtual DOM then comparison happens between current state virtual dom to the previous state of virtual dom and whatever the difference is only updated in Real DOM. So un-necessary change real dom in avoided, actually a performance benefit here.
  • As it is JavaScript based library, uses JavaScript as its programming language, React is easy to start and quick to learn. But requires a lot of other 3rd party libraries like Redux (state management), Axios (http request).etc.
  • React is used by Netflix, Airbnb, Instagram, and Facebook of course.

React is a complete library for developing static type applications where no such logical operations or computation will occur. Basically, we can develop almost anything using React. The following are some scenarios where we can use React.

  • Dynamic Applications

React uses virtual DOM is one of the reasons many developers choose it for developing dynamic web applications. A virtual DOM is actually a virtual copy of real DOM. In the case of virtual DOM, we can change any element very quickly and without rendering the whole real DOM tree. For this reason, it drastically changes the performance of the application. Imagine the difference in performance in needing to render all 100 items when just a single item is changed, versus just rendering a single changed item and not rendering the rest.

  • Single Page Applications

React is provides a great solution for single page applications because it can display all changes made to the DOM elements without reloading the entire page.

  • Native Mobile Application

React Native is like a sibling to React, is one of the popular choices to build native mobile applications. We can create apps using JavaScript with the same type of performance and feel of the apps created by Java or other mobile development based applications.

Comparison: Angular vs. React 


Factor Angular React
Support Form Google Facebook
Type Fully-featured MVC framework Open Source JS library
Programming language TypeScript JavaScript
Learning Curve Medium Low
App Size Medium Small
DOM Real DOM Virtual DOM
Date Binding Two way One way
Abstraction Strong Medium
Template HTML TypeScript JSX + JS(ES5 and *)
Native Application Development Support can build hybrid mobile apps React Native, which allows you to build a complete mobile app for either Android or iOS
App Structure MVC, Component-Based more of a ‘V’ in the MVC
Packaging Strong Medium
     

Factors: Which one to choose?

  • MVC Pattern:

Separating application into distinct, reusable, easily modifiable pieces/modules which makes an application more and more organized. React only have the view component of MVC.

Angular is developed on MVC architecture.

  • Rendering:

Rendering data into UI has two ways client-side and server-side rendering.

There can be a different situation/approach where the developer needs to make use of one of these, so choose technology which supports both, Both React and Angular use server-side.

  • Flexibility and freedom:

A decoupled component is one of the advantages of React, I mean with react I have the flexibility to choose libraries I want to use and one which I don’t. Angular, on the opposite side, offers a constrained measure of opportunity and adaptability. For instance, the most recent rendition of Angular IO, i.e., Angular 7 lets you just utilize Angular parts inside different structures and insert codes in an HTML-based application.

Endpoint React offers better adaptability and opportunity in contrast with Angular.

  • Learning Curve:

TypeScript needs to know is the case you decided to learn Angular, That is one extra burden in case of angular, Also angular is a framework with its own strict guild lines of coding that might affect the learning curve. This is not the case with React as it is a JavaScript-based library product.

  • User Experience and Performance:

React uses Virtual DOM and Fiber to build web application, Fiber will help increase its suitability in areas like animation, layout, and gestures that gives it extra lead over Angular. But with current version Angular 7 is coming up with features like Shadow API, also heard angular has used Virtual DOM in some of its features that has made the competition between the two frameworks even more intense, with none falling down in terms of app size or performance.

  • DOM:

Angular uses real DOM where regardless of whether only a specific element of it is changed or adjusted the entire tree information structure is refreshed. While, Virtual DOM is utilized by React application improvement, which allows the developers to decide or track and refresh the progressions without influencing alternate pieces of the tree.

Since Virtual DOM is considered as faster than real DOM, There can be many articles which will not agree with this statement. 

  • Productivity and Speed of Development:

Angular is ahead of React as far as advancement speed and profitability concern because

Angular uses CLI for building angular application, CLI is responsible for automating away many of the challenges and headaches that come with being a developer, Also CLI allows developers to configuration that works out of the box, baking in best practices that have been discovered by the community over time, and by helping you build more maintainable code.

Speed and profitability are affected because of the use of 3rd party libraries.

  • Popularity and Growth:

As per current market research and Google Trends, React has an upper hand in case of a larger number of ventures, git hub stars and contributors than Angular. While developers indicate more interest in Angular because of hug documentation support, accessibility of abundant of instant arrangements. Plus, both the advances are creating which implies both are mainstream in the market.

  • Job Market:

In the job market as per current trends requirement of skill set of Angular and React is roughly at the same level. As per the current job market if you are looking for jobs in UI technologies, then I would you should start learning Angular or React.

Angular configuration (Blog)

Angular Workspace Configuration

By | Angular | No Comments

In this article we will take a look at some important workspace-wide and project-specific configuration options provided by the Angular CLI.

In angular we can create a new project using command ng new project-name

ng new my-project

This command will create a new angular project with name my-project as initial Angular app.

ng new command has different configuration options such as routing support, prefix, path where new project will be created etc.  All these options are stored in a file called “Angular Workspace Configuration file” This is a json file which is used by Angular CLI to enforce the configuration schema.

Name of the file is

angular.json

In older versions of angular-cli (CLI v6-RC2) the name of the file was

.angular-cli.json

We can create new project with only project name. Angular CLI creates configuration file with default settings.

If we execute ng new my-project command, angular cli will create

  • A new project folder with name my-project.
  • An angular project with default configurations.
  • All dependencies installed in node_modules folder
  • Testing files for each components.

Default project structure for an angular project

Angular.json blog Image

The settings from this file are used when we

  • Generate angular features likes components, pipes, services etc
  • Run unit and end-to-end tests
  • Build the application etc.

Our command ng new my-project will generate angular.json configuration file similar to this.

Sample angular.json file

Angular.json

At the top level of the file, we will see following properties.

  • version: The configuration-file version.
  • newProjectRoot: Path where new projects are created. Absolute or relative to the workspace folder.
  • defaultProject: Default project name to use in commands, where not provided as an argument. When we use ng new to create a new app in a new workspace, that app is the default project for the workspace until we change it here.
  • projects:  Contains a subsection for each project (library or application) in the workspace, with the per-project configuration options.

The initial project/app that we created with ng new my-project command is listed under “projects” section.

"projects": {
"my-project": {
...
}
...
}

We can create multiple projects or application within the same workspace. Each additional project/app that we create will have its own configuration section.

Note :  When we want to create a completely new workspace we start with ng new command. If we now want to add additional application/project in the same workspace we need to use ng generate application command.

Project configuration options:

The following top-level configuration properties are available for each project, under projects:[project_name] section

"my-project": {
"root": "",
"sourceRoot": "src",
"projectType": "application",
"prefix": "app",
"schematics": {},
"architect": {}

root: The root folder for this project’s files, relative to the workspace folder. Empty for the initial app, which resides at the top level of the workspace.

sourceRoot : The root folder for this project’s source files.

projectType : One of “application” or “library”. An application can run independently in a browser, while a library cannot.

prefix : A string that Angular prepends to generated selectors. Can be customized to identify an app or feature area.

Schematics: A set of schematics that customize the ng generate sub-command option defaults for this project

Architect: Configuration defaults for Architect builder targets for this project.

We can change different settings in this configuration file. For example, if we do not use the –prefix option with the “ng new” command, then the default value “app” is stored in the configuration file for “prefix” setting. So the root component (appComponent) that is created at the application generation time has “app” as the selector prefix.

Now if we want to use “alphonso as a prefix for new components , filters, pipes, services etc we can go and change prefix from default “app to alphonso

Any new component that we generate in the future using the following command

ng generate component [componentName]

will also have “alphonso as the selector prefix

Build configuration options

Build options are under “architects” section. This section contains default build target options, used when no named alternative configuration is specified.

"architect": {
"build": {
"options": {
"outputPath": "dist/my-project",
"index": "src/index.html",
"main": "src/main.ts",
"polyfills": "src/polyfills.ts",
"tsConfig": "src/tsconfig.app.json",
"assets": [
"src/favicon.ico",
"src/assets"
],
"styles": [
"src/styles.css"
],
"scripts": [] },

Here is the significance of different build options

output-path : Path where build output will be placed.

main : The main entry point for your application.

Polyfills : Provides polyfill scripts for browser support.

ts-config : The name of the TypeScript configuration file.

Index.html : The main HTML page that is served when someone visits your site

tsconfig.json :  Application-specific TypeScript configuration, including TypeScript and Angular template compiler options

assets : An object containing paths to static assets to add to the global context of the project. The default paths point to the project’s icon file and its assets folder

styles : An object containing style files to add to the global context of the project. Angular CLI supports CSS imports and all major CSS preprocessors: sass/scssless, and stylus.

We can modify above build options to change how default build works. For e.g.  we can change the folder in which build output is stored.  We can also add more assets and styles which will be copied to the build.

Thus with “Angular Workspace Configuration” we can create consistence sources of multiple internal applications and libraries, with one configuration file.